 |
| HELLO AGAIN!!! It has been a while, since our last visit but taking some time off so that I could focus on the pressing and needful tasks related to my mother's passing last year, was exactly the right thing for me to do. I wish to thank each of you for your kind and loving comments and your expressions of sympathy and concern as well as your private letters of support and encouragement throughout this period of transition ... You've all been an enourmous blessing to me and all I can say again, is Thank you! *** moving forward.... After Christmas was over, I had time to relax and think about what I wanted to do next, regarding my minis. My new year's resolutions are to actually TRY and DO some of the interesting mini tutorials which have intrigued me, and which I have been saving via Pinterest, as future "one day- someday" projects. Now was time to actually seize the day and begin making those minis, instead of only thinking about it. I am rather slow in getting started on new projects, but once I'm set in motion, I tend to make a LOT of whatever it is that I've decide to tackle. Thus it was that during my blogging hiatus, I spent much of my time making &/or modifying many mini foods. I also tried out some new product "recipes"and almost all of them are of non-fimo sources. I experimented with combinations of papers, inks, glues and embossing powders as well as tried out the old-fashioned salt dough recipe (which was popular back in the 70's and 80's ) and from which I successfully made my first savory mini quiches! :D I also put together some new designs for large perfume/vanity trays; which I'll feature in my next post. I made mini butterfly soaps from a new type of translucent polymer substance which I'd ordered from Asia, and I made mini bath salts and luxury lotions from acrylic pegs. One evening I made 6 different styles of bird cages combining techniques from several blogs and youtube Tutorials. The cages are made from paper, glue, beads, plastic, paint and florist wire. Last but not least, I bit the bullet and ordered, 6 new Punch Bunch mini paper punches with the aim in mind to make miniature ROSES just for the fun of it! |
 |
| What you will be seeing in the following photos are some of the results of my playing around with much of what I've already mentioned and specifically featuring the results of those paper roses. I made use of a variety of different types of paper products when constructing each batch of flowers. The Orange colored roses are made of coffee filters, the Light Pink are from tracing paper, and the Velvety Red Roses were made from thin, cheap construction paper. The leaves were made of card stock, construction paper, crepe paper, or photocopy paper. Some of the leaves are a bit thick but since these are all first time experiments, I'm not too overly concerned. Now this is how this post featuring these roses came about ..... My sister Bev and I made a day trip down to Seattle to visit our aunt in the hospital. On the return trip home we made a "quick"stop at THE HOBBY LOBBY ( a crafter's paradise, where I could have looked for hours! ) It was there that I found some 59 cent sheets of large patterned Toile scrap book paper which I simply could NOT resist! Wanting to use this as wallpaper for my backdrop, as well as feature the arm-full of Roses, the 6 rusty birdcages, a few of the perfumes as well as some of my mini edibles, I began composing this scene adding and subtracting until eventually it took on a look of its own and reminded me of something I'd likely see between the magazine pages of "VICTORIA" a semi-shabby and Romantic Pastiche I shall describe some of the sources for some of the props I used and I will try to be brief. However, I must say that this was one of THE MOST ENJOYABLE projects that I have ever photographed. I couldn't stop taking pictures! I LOVE THESE ROSES! |
 |
| The set up: I used a few of my newer yet still homeless aqua colored perfume bottles to sit atop of a lacy Stewart Dollhouse doily which came in the mail courtesy of Kat (Kitty and Kat blog) http://kittyandkatminiatures.blogspot.ca/ Her surprise parcel arrived soon after Christmas which included not only this doily but also a number of other mini goodies destined for LAND'S END. thank you Kat! :D Kat is such a sweet lady and she has such a great sense of humor and I would encourage each of you to pay her blog a visit and see for yourselves, all of the wonderful minis that she is always busy producing- I think she's Amazing! :)) This delightful doily was the perfect size and color for the top of my French-style Dressing table which I have repainted yet again, (for the 11th time) |
 |
| For this photo, I'm showing my Monica Roberts silk chapeau bought in the 1990's. The patterned silk on both the hat and the dress, are vining bud roses in pale pink, blue on cream; delicate and pretty, and perfect for a summer party in the rose garden. |
 |
| This is the dress that goes with the hat... and here they are together. |
 |
| I just love them and I'm so glad that I found them again after having put both the hat and the dress away years ago,... for safe keeping now back to the roses... |
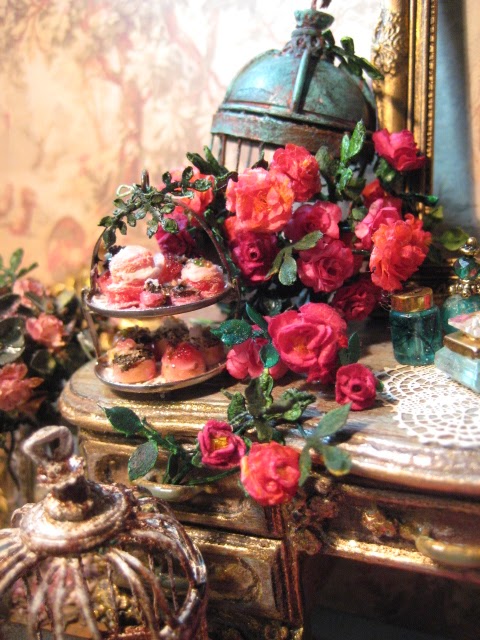 |
| Initially, I was going to display the roses up-right in a glass vase. They looked both stiff and formal and kept toppling over, so I tried deliberately spilling them onto the vanity and liked the resulting effect better. But because the stems are long and the flower heads heavy, they shifted and slid off onto the floor every time I tried to arrange them. So in order to anchor the roses, I poked the stem lengths into one of my new/old birdcages. The cage kept the roses stable as I fiddled and fussed, and arranged and re-arranged everything else including the 2 tiered cake tray, around them. The two tiered cake tray is one that I made from 2 large paper fastener purchased at Michael's. I had a surplus of them as well as some other craft materials and so I mailed a craft care package to our Aussie-based Miniteer- Linda Park (Linda's Mini World blog) Miniteers of Vancouver and she sent me back some lovely photos of how she had used some of the items she'd received. In one of her photos, Linda had a BEAUTIFUL cake stand perched on a table outside her Salon de Tea' and when I inquired about it she told me that she made it from some of the paper fasteners which I had sent her! Simply BRILLIANT!!! I'm hoping that she will show it and do a tutorial on it, because her results are Elegant & Refined but in the meantime I tried a shabby version of my own. Mine doesn't compare at all with Linda's, yet it still works well enough for this composition. I took photos of my cake stand positioned on both sides of the vanity and you will get a better look at it towards the end of this post. |
 |

 |
| I removed the wide brimmed hat to make way for the chicken! |
 |
| Before I forget, this is the scrap book paper I used for the backdrop. It has a tan colored back-ground with muted sage green and burgundy within the print, and I just noticed that there are chickens pictured in it too!!! YES! Although I couldn't get a clear shot of the true colors of the paper, at least you are able to see the fabulous pattern. |
 |
| I didn't set out to match the roses to the wallpaper- that was a fluke! The orange and pink roses began as one color- light pink. I used a variety of mediums including acrylic paints, ink pads and felt pens. Soon the pink ones began looking more coral as I added more and more yellow felt pen to their petals. The pink ones became pinker with the addition of burgundy and the red roses got redder with layers of applied red ink. I liked using them all. I love the transparency of using the ink pads but Fair Warning: the colors bleed so I had to fix the stain into the paper so that it wouldn't smudge. For that I used clear Matte Nail varnish, Matte Mod Podge and/or liquid floor wax and sometimes a combination of all three! |
 |
| For this photo I found a metal angel which I had already painted and aged. I laid it under the roses and draped some of the roses around it. The vintage fashion picture behind it, is a magazine cutout, as is the large painting below... |
 |
| I had saved this picture of a girl and her dog in my paper files. I had clipped it from a design magazine and later I discovered that it was the PERFECT FIT for the carved gilt frame which I had found in a bag of craft junk from the thrift store. The frame was originally a souvenir from Paris. I removed the insert and replaced it with this print. This pairing,was obviously meant to be and I love the final results :D |
 | ||
| The candlesticks were failed attempts at Shabby Chic. I made them about 3 years ago but I've never been happy with them. Yet when I needed something tall for the left side of the vanity, these worked a treat, and now I think like them again! :)) The china sheep ornament I made years and years ago. They are model railroad livestock. The rooster I bought from the Seattle Show last March. This is the second time I have used this same bird. His brother is also prominently featured in my roombox "Gothica" http://studioeminiatures.blogspot.ca/2013/06/best-in-show.html
|

 |
 | ||
| Here are some more rusty bird cages which I made last week. I have taken some photos of the process to share with you as a future tutorial. They were fast, fun and very easy to do. After I painted them, I aged them with the Cinnamon Rust tutorial which I posted in ("Meeting Rusty at the Game") http://studioeminiatures.blogspot.ca/2015/09/meeting-rusty-at-game.html
|

 |
| The bird cage on the left of the bag is another one of mine and the bird cage to the right was an old purchase which use to be shiny brass, which I've painted brown and aged. |
 |
| For this composition, I draped the Monica Roberts dress, and included the 2 blue enamel BEE vases that Janine made for me in back in the 90's. I filled her vase with my loose- leaf version of meadow flowers ( white sand glued onto grassy synthetic fibers) My tall bird cage to the right was fitted with a set of "iron keys" which I found at the HOBBY LOBBY. I gave a set to each of The Miniteers when they came by for our monthly mini get-together. You can see that I've aged my keys with the easy-peasy Cinnamon Rust technique. |
 |
| In Janine's ( Minworks blog ), French House Salon she featured a BEAUTIFUL matched set of burgundy eel skin luggage, cleverly constructed by using paper matchboxes as her base. I LOVE HER LUGGAGE! A few days ago, as I was looking at my mini grouping which was still under construction, I decided that it could use some blue. (what about blue luggage?) I would have to give it a try. I used Janine's luggage as inspiration and a simple paper suitcase tutorial I found on youtube by Cheers Charms/ suitcase video https://www.youtube.com/watch?v=LcTmT6JwKAo I cut up a worn out pair of faded blue Ralph Lauren leather gloves which I'd saved for ages. I wrapped the match boxes with it top, bottom and sides. I sliced the suggestion of a lid into the leather with a craft knife, and added hardware made from earring bits and jewelry findings, which were later painted and aged. These were so easy to do and I had fun experimenting with aging the leather and giving the luggage distinctly beat up appearance. Not too shabby for my first try! |
 |
| The sexy slides are charms from some wine glass markers which I'd found at the thrift store ( of course) I cut off the jump ring that was attached at the heel and toned down the high gloss black upper with some Revlon Matte nail varnish. I think that they look pretty good under the hot pink silk, ( lining from a man's tie) vanity stool. 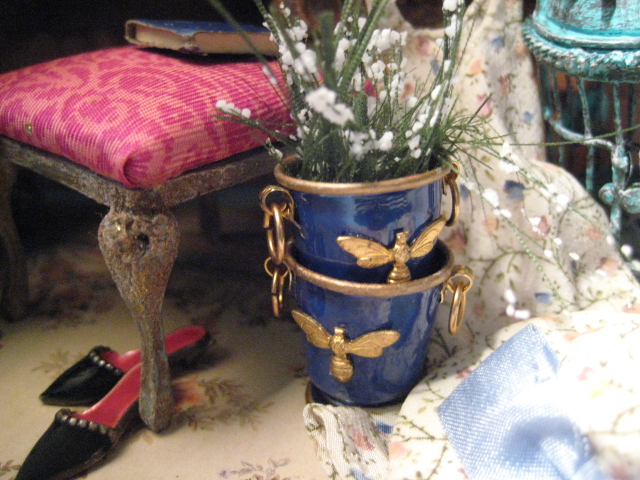 |
 |
| The clock face perched on a plate stand, is a button with the word Paris on it. It is mounted into a brass button cover. The brass was too shiny and too new so I gave it a coat of Revlon Matte Nail polish to dull the finish and when it was dry, I dabbed it with a brown ink pad over the brass and on the clock face, which served to tone it down to a more subtle and suitable patina. |
 |
| This poor plant is a rose topiary which I purchased in Seattle Washington a long time ago. It has seen better days. The leaves have faded over the years but the roses are still going strong. I don't know who made it, but I've always liked it even though it has been bashed about from here to eternity as I have tried unsuccessfully, to find a permanent home for it. I have in mind, a future project for this topiary and hopefully by then it can actually put down its tiny mini roots and "bloom where it is planted"! |
 |
 |
 |
| The little round blue china dish, is by Tasmanian porcelain artist Margaret Crosswell. She sells only at shows down under and so Linda Parks brought this over for me during her bi-annual Canadian vist last summer. It's perfect! :D |
 |
 |
| I had mentioned the tiered cake tray earlier on which I made from large paper fasteners from Michael's. and this will give you a closer look-see. I affixed some tiny leaves and a metal cherub to the top of the tray and laid some doilies on the plates. Most of the pink dainties are made from styrofoam meat packaging, cut using a circle hand punch and then decorated. |
 |
| The plate of French Macarons were the result of our January Miniteer's meeting. Linda brought our mini project, which Fatima, Janine and I were Absolutely DELIGHTED with! These macarons were made from tiny, colorful paper brads and very thin craft foam. Aren't they ADORABLE?!!!! |

 |
 |
| Well, that's all for now but in conclusion, I hope that 2016 will bring all of my readers many Creative and Happy hours of Mini-making in whichever form they take. Personally, I feel that I'm off to a good start. I'm looking forward to producing more tutorials this year and I already have some waiting in the wings. I will get to those eventually but for now, I think I am still in the mood to make flowers.... meanwhile here's wishing all of you a Happy Valentines Day! eat chocolate, share love, and send ROSES elizabeth |
.jpg)

